

New guitarists might find it intimidating to replace their guitar strings, though luckily, the process is simpler than it appears. By following our systematic instructions with the necessary equipment, you can change your strings fast hassle-free, and give your guitar a refreshed sound.
What Tools Do You Need for Changing Guitar Strings?

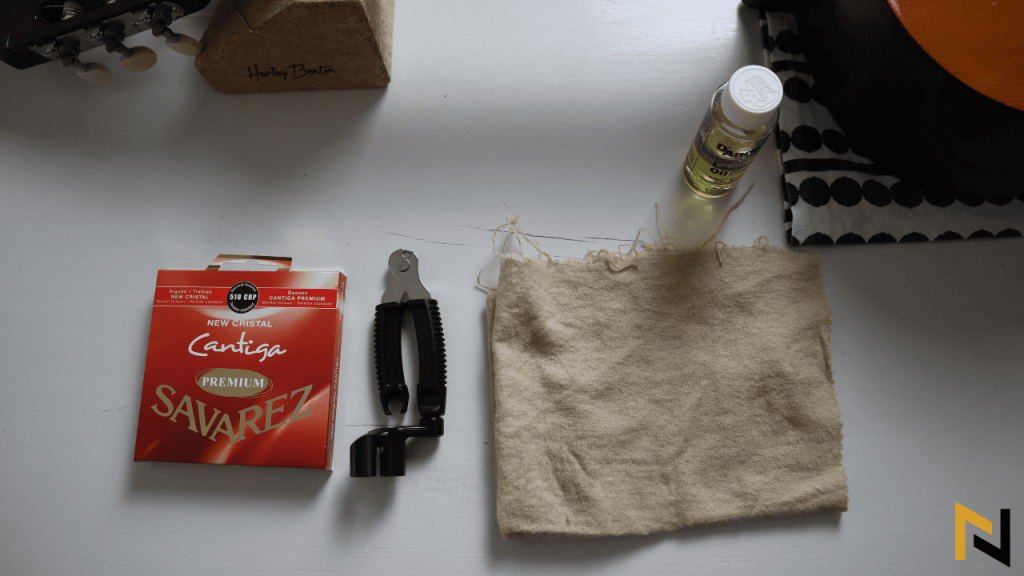
The first thing you’ll need to do is gather all of the proper equipment.
- Your new strings (not sure which strings you need? Check out our guide!)
- String cutters (wire cutters work too)
- A tuner
- A string winder (optional)
- Microfiber cloth (optional)
- Lemon oil (optional)
- Guitar polish (optional)
- Screwdriver (with electric guitars, but not always needed)
- Hex key (with electric guitars, but not always needed)
How to Change Acoustic Guitar Strings in 9 Simple Steps

1. Loosen the Strings

Loosen the strings and remove each from its respective tuning peg. At this point, I highly recommend using a string winder, as it can expedite the removal process.
2. Remove the Bridge Pin

If you’re having trouble getting the bridge pin out, I recommend pushing the string towards it to shift it back into the body of the guitar. Using a screwdriver can also help, but cover the bridge with something in order to avoid making scratches. If this doesn’t work, you can move on to step 3. Note that if you have a pinless bridge, you can skip this step.
3. Push the Pins from Underneath
Another way to get unruly bridge pins out is to push them from underneath the body of the guitar. You can do this by sticking your hand in the sound hole and feeling around where the bottoms of the bridge pins are located. If you don’t know what your pins look like from the bottom, I recommend using a cloth to protect yourself, as some can be sharp.
4. Remove Pins with a String Winder

Pins still giving you trouble?
Check your string winder! You might see a small slot at the top that you can use as a removal tool. Just make sure you’re careful not to leave marks on the bridge when removing your pins with your winder, so covering the bridge with something is smart. If you don’t have a string winder with a slot, you can try a small pair of pliers with a soft cloth wrapped around the teeth.
5. Clean Your Guitar
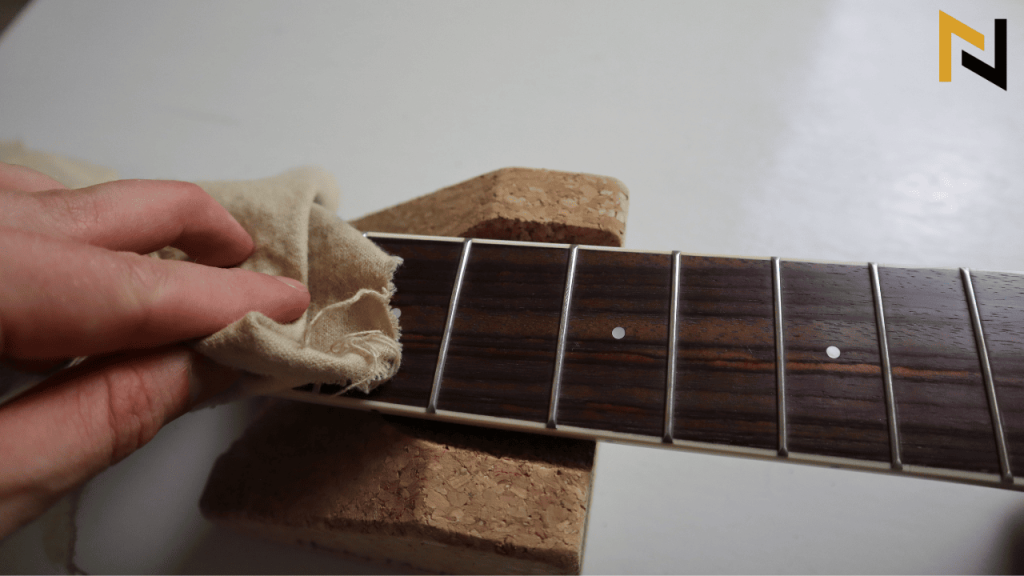
Once your strings are removed, this is an excellent opportunity to clean your guitar, especially in typically hard-to-reach areas, such as the saddle, bridge, and fretboard. If you have a dark wood fretboard, such as ebony or rosewood, you can apply a small amount of lemon oil to a microfiber cloth and work it gently into the fretboard. You can be liberal here, just don’t soak it!
6. Lock Your Strings In Place
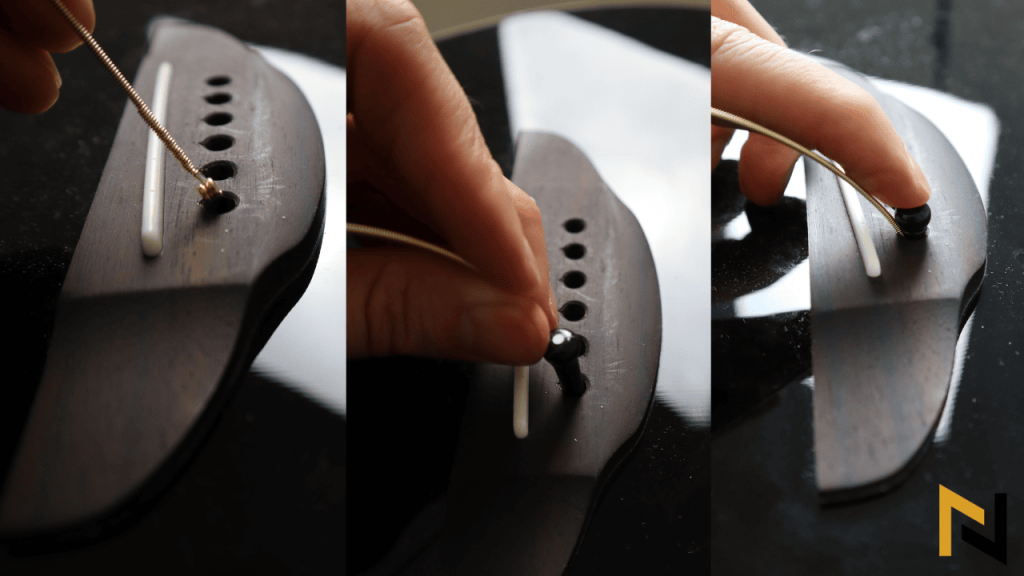
Starting with your thickest string, create a 45° angle near the ball end and slide it into the bridge pinhole. Making sure that the ball sits perfectly at the end of your bridge pin will optimize your guitar’s tuning stability.
While holding your string in place, push down on the top of the bridge pin to lock it in place. Repeat these steps for each one of your strings.
7. Run Strings Through the Tuning Pegs

Start by turning each of your machine heads so that the holes are pointing directly down and across the fretboard toward the bridge. Carefully guide your string atop the saddle and nut into its correct slot and through the hole in the machine head.
Pull the string tight and leave around 2.5 inches (6.3cm) of excess string and cut the rest off. This will give you more than enough excess string to wind around the post.
8. Begin Winding
After measuring and cutting the excess string, thread it back through the post and begin winding counterclockwise, ensuring that you maintain enough tension to preserve your initial measurement. Make sure that each new wrap or rotation is on the bottom of the previous wrap.
A few winds around the post should be more than enough.
9. Cut and Tune

Trim off the excess string with a pair of wire cutters. Try and get as close as possible to the post for a cleaner look. Repeat this process, moving from the thickest string to the thinnest string. Once every string is in place, you can use your tuner to bring each of them up to pitch.

Want to learn how to take better care of your acoustic guitar? Check out our comprehensive guide!
How to Change Strings to Classical Nylon String Acoustic Guitar?
1. Loosen and Remove the Strings

Just like you would with a standard acoustic guitar, detune the strings to the point where you can unwrap or cut them, and them remove them from the guitar.

2. Tie Your New Strings to the Bridge
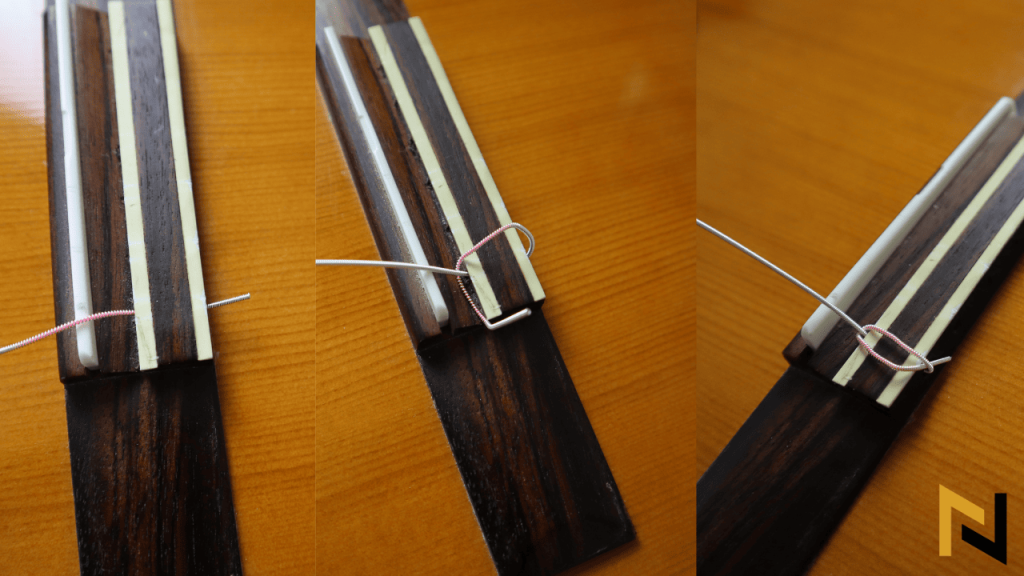
Now before we dive in, it’s important to note that one end of your nylon acoustic guitar strings might have a wider wrap, a distinct texture, and this end might also be a bit looser. You should attach this end to the bridge.
Start by inserting this end of the new string through the bridge hole. Wrap the tail around the main length of the string, and to make things easier, you can then crimp the string to mark that spot. Next, tuck the string’s tail underneath the loop you just made.

For the low E and A strings, you may only need to tuck them under one time. However, you may need to wrap the other strings twice. You’ll then want to cross the extra tail-end length of each string underneath the knot of its neighbor to keep the bridge looking clean and keep the strings sturdy under tension.

3. Route Through the Tuning Pegs

Next, you can route the strings through the holes found in the middle of the tuners or posts.
When trying to determine the amount of slack that I need, I typically do so by holding the string a fingers width above the 12th front and seeing how much slack remains at the tuning peg. I’ll then create a crimp to mark the string at the point where I need to begin winding it near the tuning peg.
Wrap the string’s tail around the length of the main portion of the string about two or three times. Next, use your string winder to tighten the string on the post, guiding each rap toward the outside of the headstock near the tuning pegs.
4. Cut and Tune

Snip away the extra string bits with string cutters, aiming as close as you can to the tie block to make it look neat. When all strings are cut, grab your tuner and tune your axe!
How to Change Electric Guitar Strings in 5 Simple Steps
1. Remove Your Old Set of Strings

The first step in replacing the strings on your electric guitar is to remove the old strings. You can do so by loosening each string until it is completely slack and then cutting them.
Make sure to recycle your strings once they’re off!

2. Clean Your Fretboard
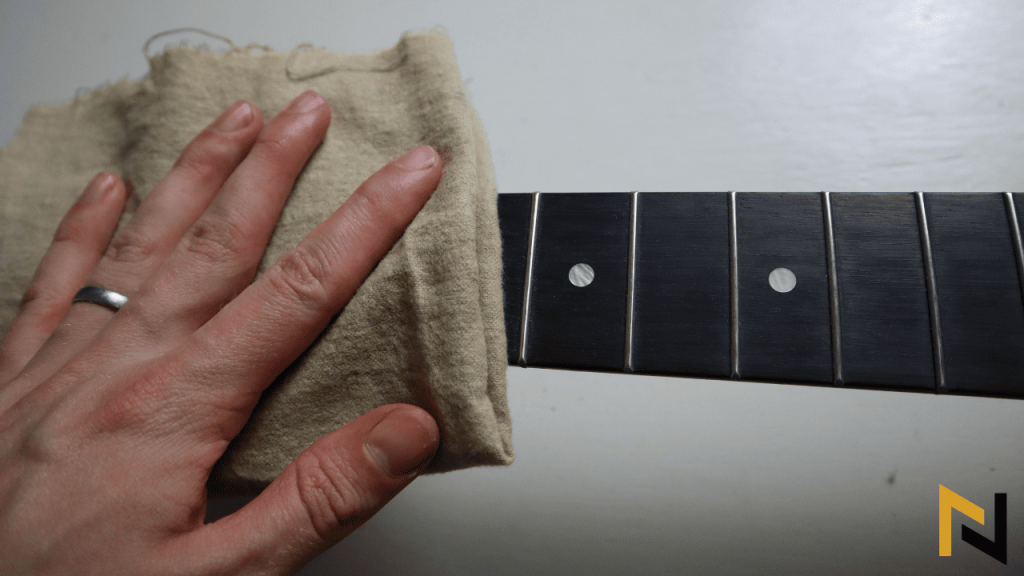
As we said before, when removing all of your strings, it becomes an opportune time to clean your guitar’s fretboard. Using an appropriate cleaner and a soft, microfiber cloth, you can begin getting rid of any debris that have accumulated over time.
3. Insert Your Strings

Remove your new set of strings from your packaging and identify each of them based on the ball end (strings usually come with instructions that help identify which string is which). The way in which you will insert them through the bridge will depend on the type of bridge that you have, such as a Floyd Rose, hardtail, or TOM bridge, though the generally important thing is to make sure that each string is aligned over its given bridge saddle and nut slot.
Learn more about different electric guitar bridge types here.

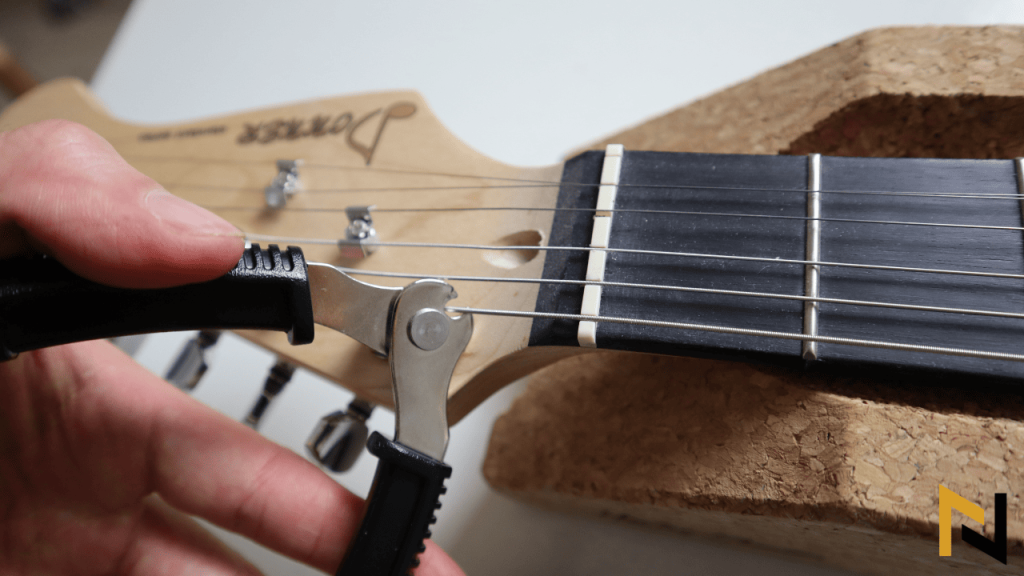
4. Trim the End

Pull your string through its corresponding post hole and pull the string tight and leave around 2.5 inches (6.3cm) of excess string left and cut the rest off (it’s better to leave too much excess string length than having too short strings).
5. Tighten the Strings and Tune

Turn your tuning key with your fingers or a string winder to tighten the strings, ensuring that the strings wrap downward along the tuning post. Once each string is locked in place and in tune, you can trim off any excess length.
String change time is always a good time for a little review of your strings. Check out our “How to Choose Electric Guitar Strings” guide.
Must-Know Guitar String Change Tips
Stretch Your Strings Periodically

You can speed up the process of settling your guitar strings into pitch by manually stretching them. Although they will still naturally stretch for a few days after you change them, stretching them out by hand can accelerate the process. Use your hand to gently pull up on the strings and stretch them periodically until they stop slipping out of tune.
Remove Strings One at a Time to Maintain Tension
As you may already know, most guitars feature a component called a truss rod, which runs throughout the length of the neck, counteracting the tension produced by the strings. When you remove all of your strings at once, you eliminate the tension, which can potentially cause the truss rod to bend the neck in the opposite direction.
Sometimes, installing strings might not be sufficient enough to restore the neck to its original position, which is why many people like to change one string at a time to better preserve the balance between the truss rod and string pressure.
Stick with the Same String Gauge
To prevent any issues with your action, intonation, or truss rod, I recommend sticking with the same string gauge that you currently have on your guitar when changing your strings. Switching to a heavier gauge set of strings can increase tension on the neck, while switching to a lighter gauge set of strings can overcompensate the truss rod, lowering the action and resulting in nasty string buzz.
Tune Up, Not Down
When tuning your guitar, tune up to pitch instead of down, as it will be more likely to stay in tune.
FAQ
How Often Should You Change Guitar Strings?
Though some professional guitarists are adamant about changing their strings after every gig or studio session, most guitarists can get away with changing their strings every three months or so.
Can I Change The Guitar Strings By Myself?
Absolutely! If you don’t already know how to do it, you have a guide right above this!
Do Guitar Stores Change Strings for Free?
I have personally never had my strings changed at a store, though I would assume some major guitar stores will change your strings for free if you make a purchase or get a setup there. But if you just go there with a new set of strings, it’s not likely that they are going to change them for free. They are running a business after all.
How Much Does Changing Guitar Strings Cost?
If you are restringing your guitar by yourself, you’ll likely spend around $10 to $30, depending on your strings. On the other hand, if you have a professional do it, you’ll likely spend anywhere from $25 to $50.
In What Order Do You Change Guitar Strings?
Though it doesn’t necessarily matter what order you change your guitar strings in, most people start with the thickest string and work their way down to the thinnest string. Note that with floyd rose and floating bridges you should not leave the thinnest strings alone to the guitar with full tension. This is because the force exerted by the springs located at the back of the guitar could cause thinnest strings to snap.
Is it Easy to Restring A Guitar?
Once you get used to restringing your guitar, it’ll be super easy (not to mention fast). Plus, installing a new set of strings on your own can be very rewarding!
Conclusion
Now that you have a shiny new set of strings on your guitar, you’ll want to make sure they last as long as possible. To extend the lifespan of your guitar strings, I recommend always cleaning your hands before you play and wiping the strings down with a cloth after each playing session to prevent oil and dirt from building up.
If you have any questions or thoughts, just leave a comment down below!
Happy playing from all of us at guitaristnextdoor.com!